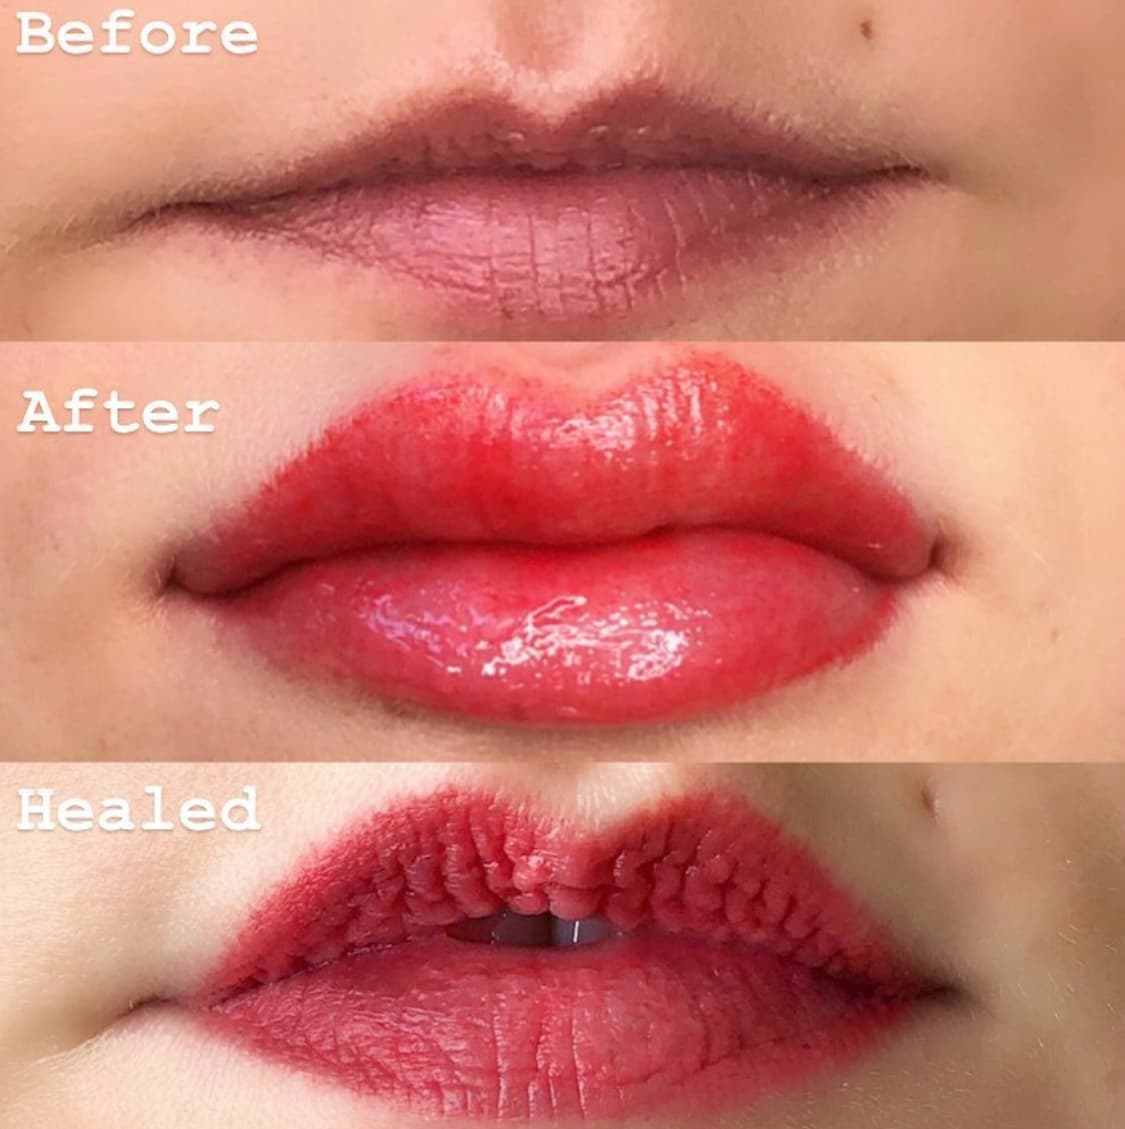
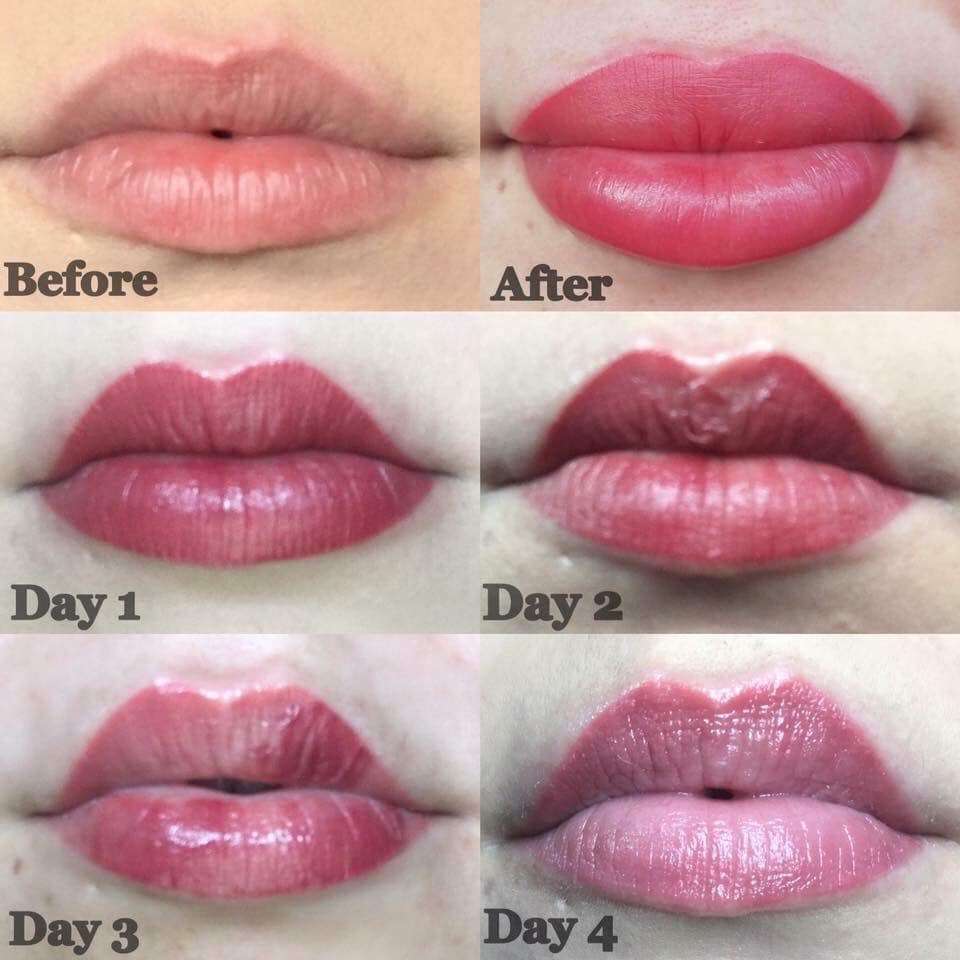
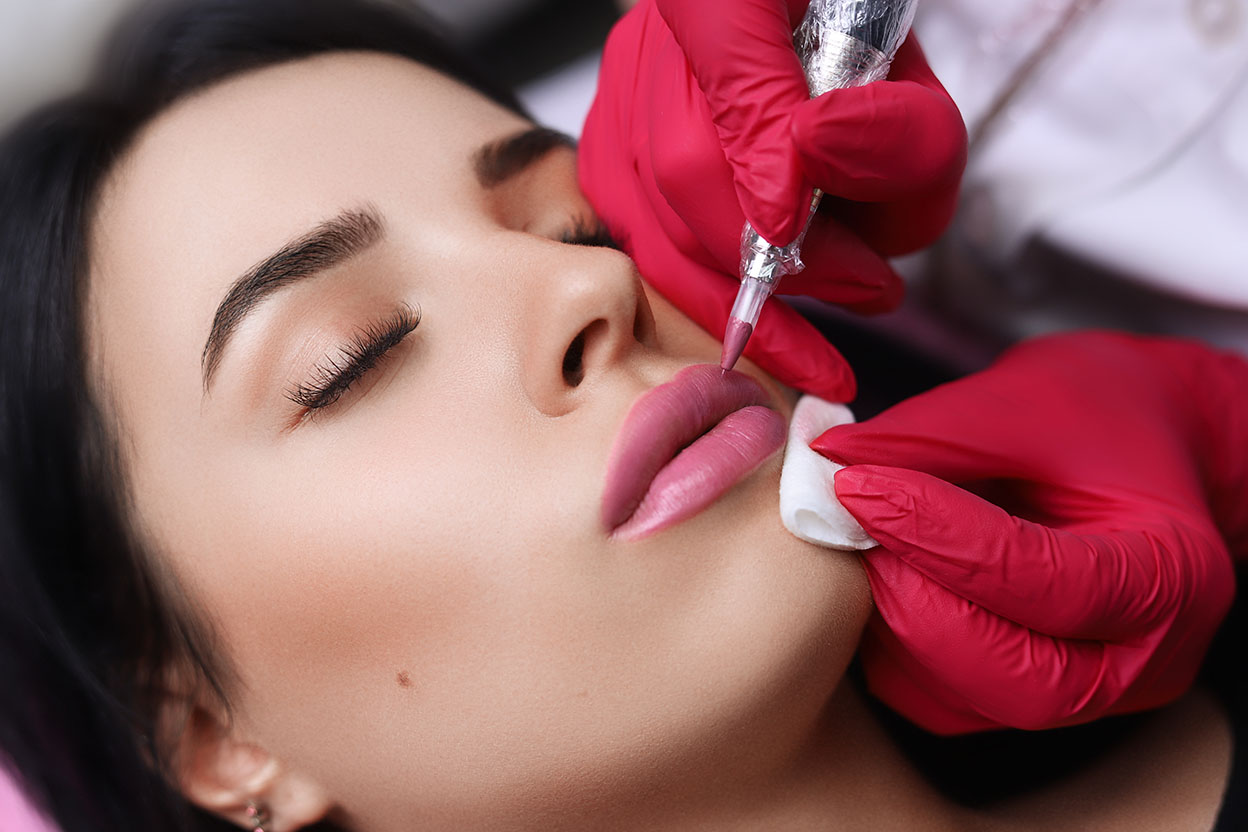
Lip Tattoo Healing: Day-by-Day Journey
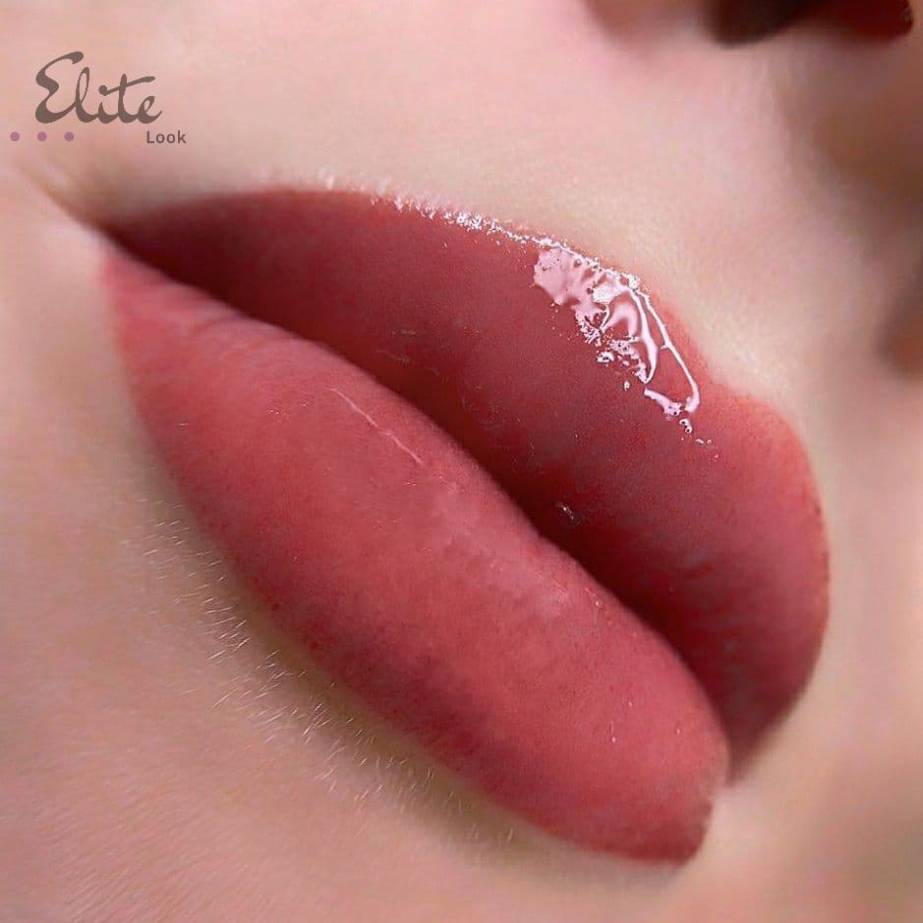
Walking through the lip tattoo healing process day by day reveals a fascinating transformation—from raw sensitivity to soft, vibrant color. This personal journey captures the highs and lows, with real-life photos showing how the skin adapts over time. Each stage offers insight into recovery, care, and the beauty that emerges naturally. For those considering a lip tattoo, seeing the healing timeline in action can be both reassuring and inspiring. Lip tattoo after 5 years shows how long-lasting and resilient these designs can be.
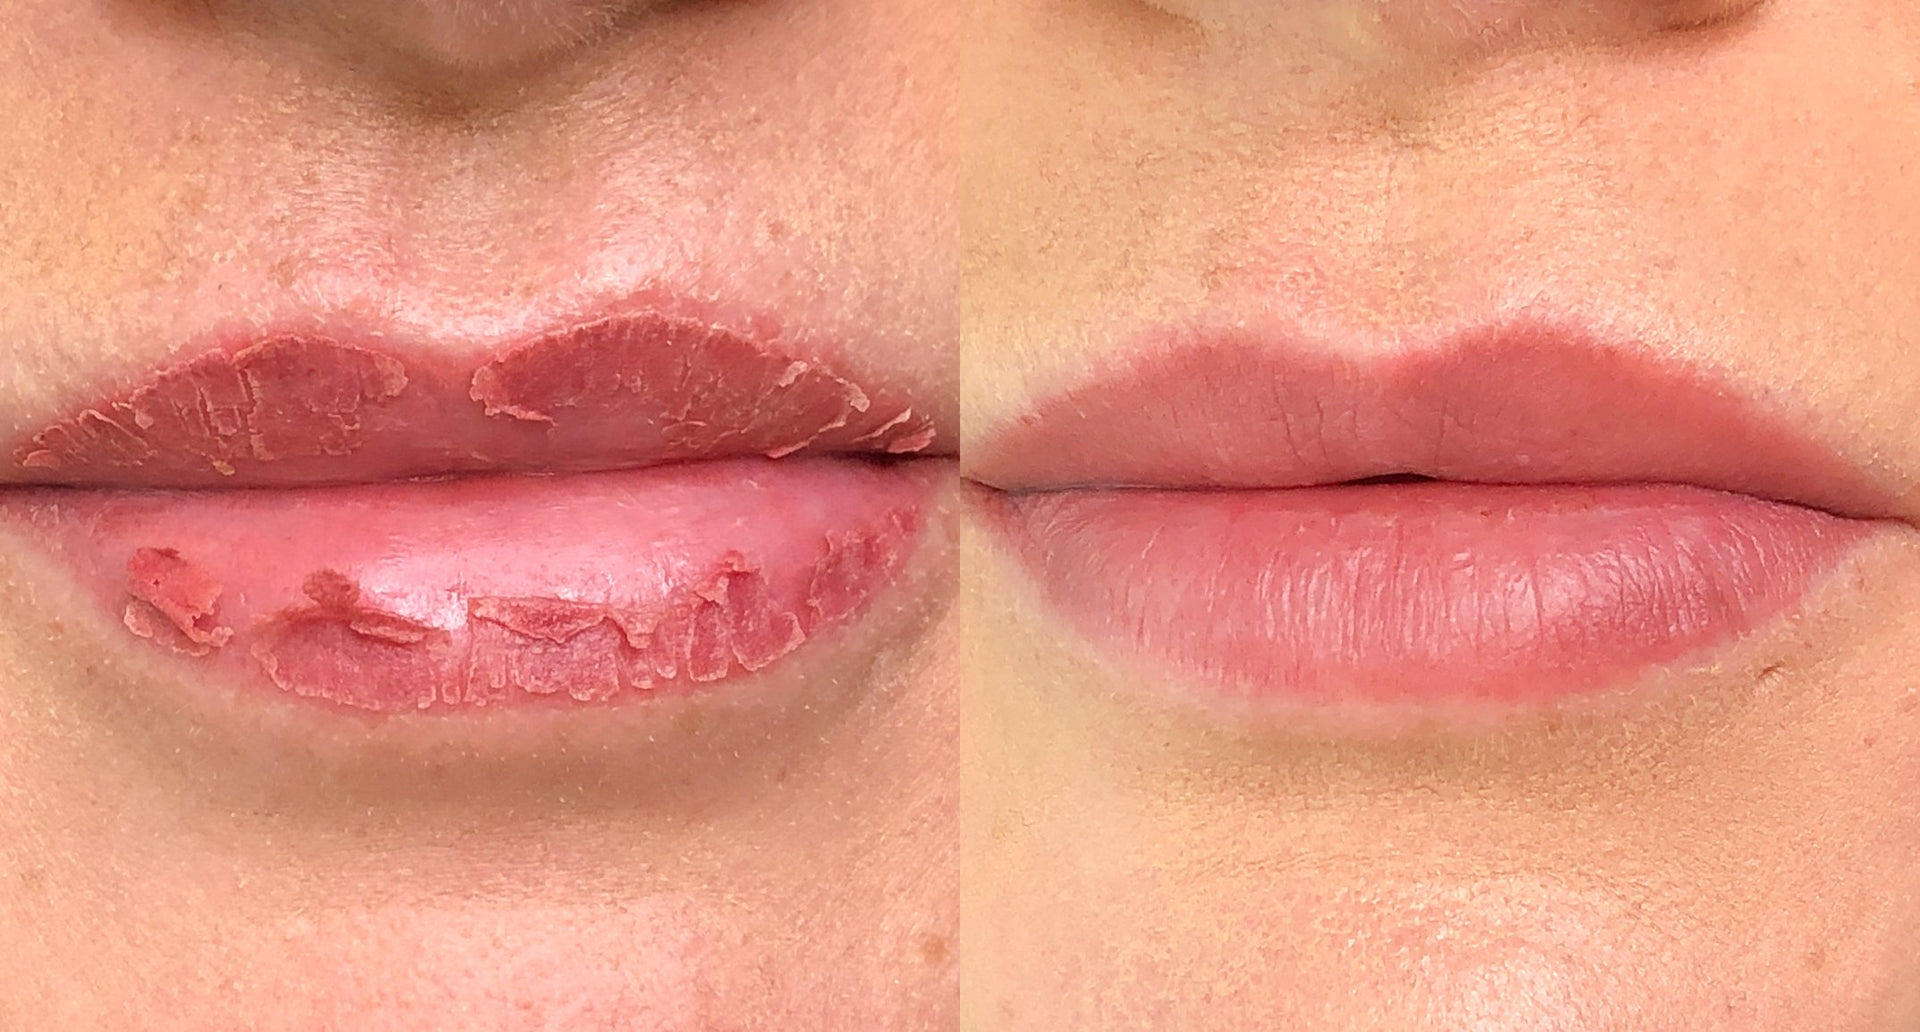
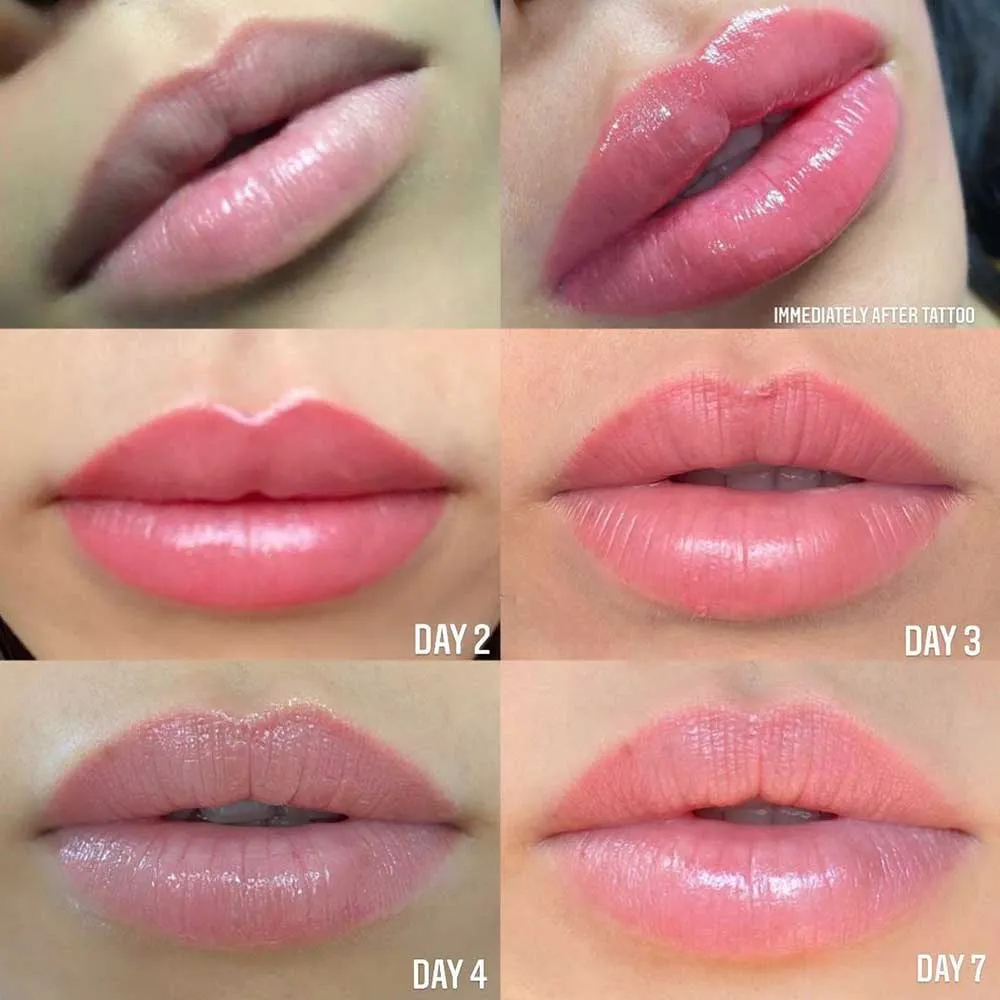
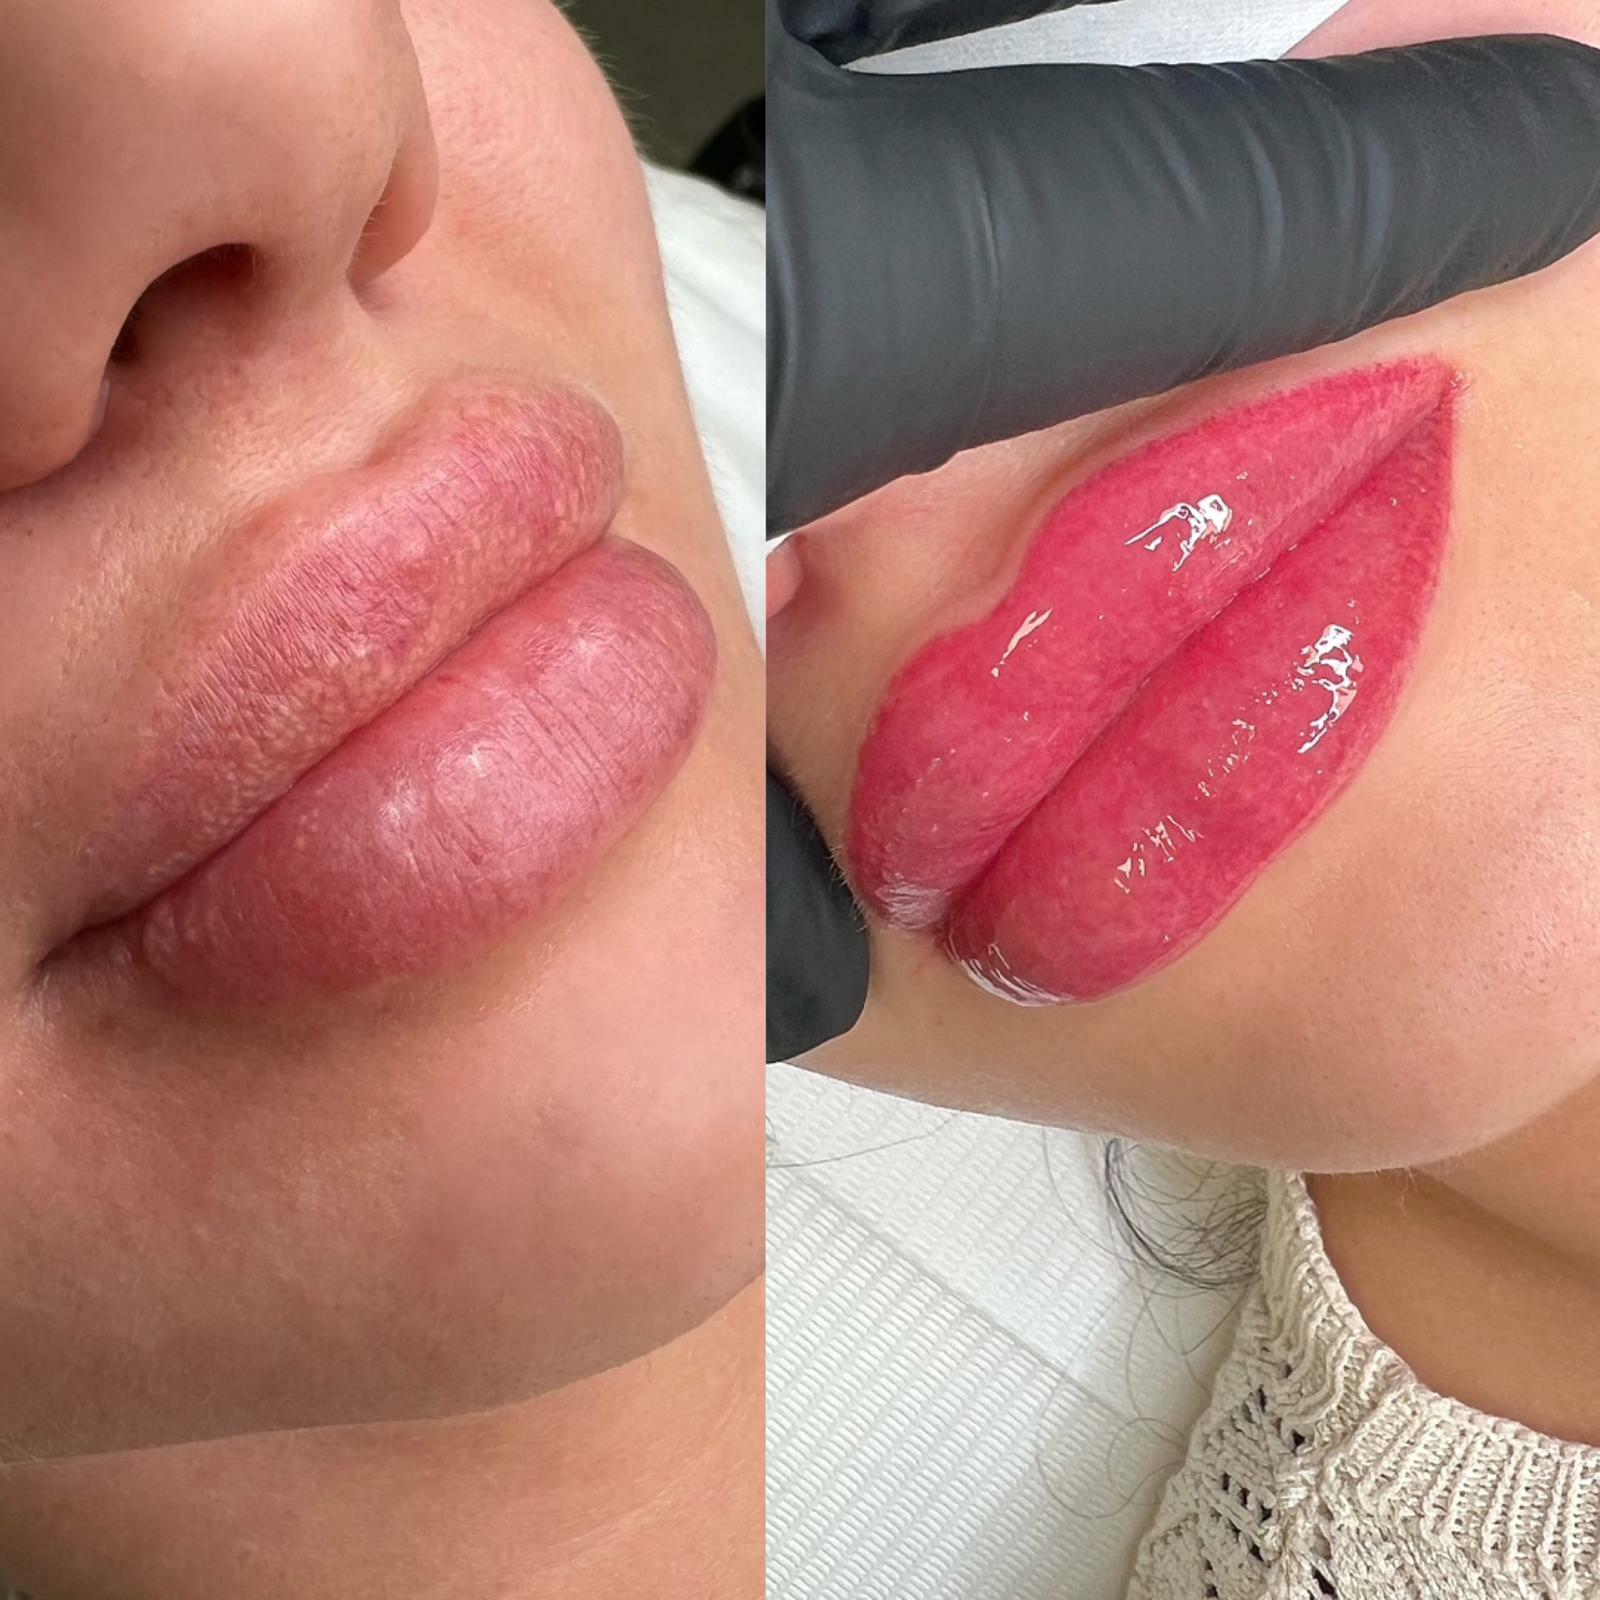
Day one starts with redness and swelling—normal and expected. The first 48 hours are crucial for managing discomfort and preventing infection.
By day three, the skin begins to calm, and you’ll notice the initial pigment setting in, setting the stage for the next phase of healing.
Lip Tattoo Healing: A Day-by-Day Guide
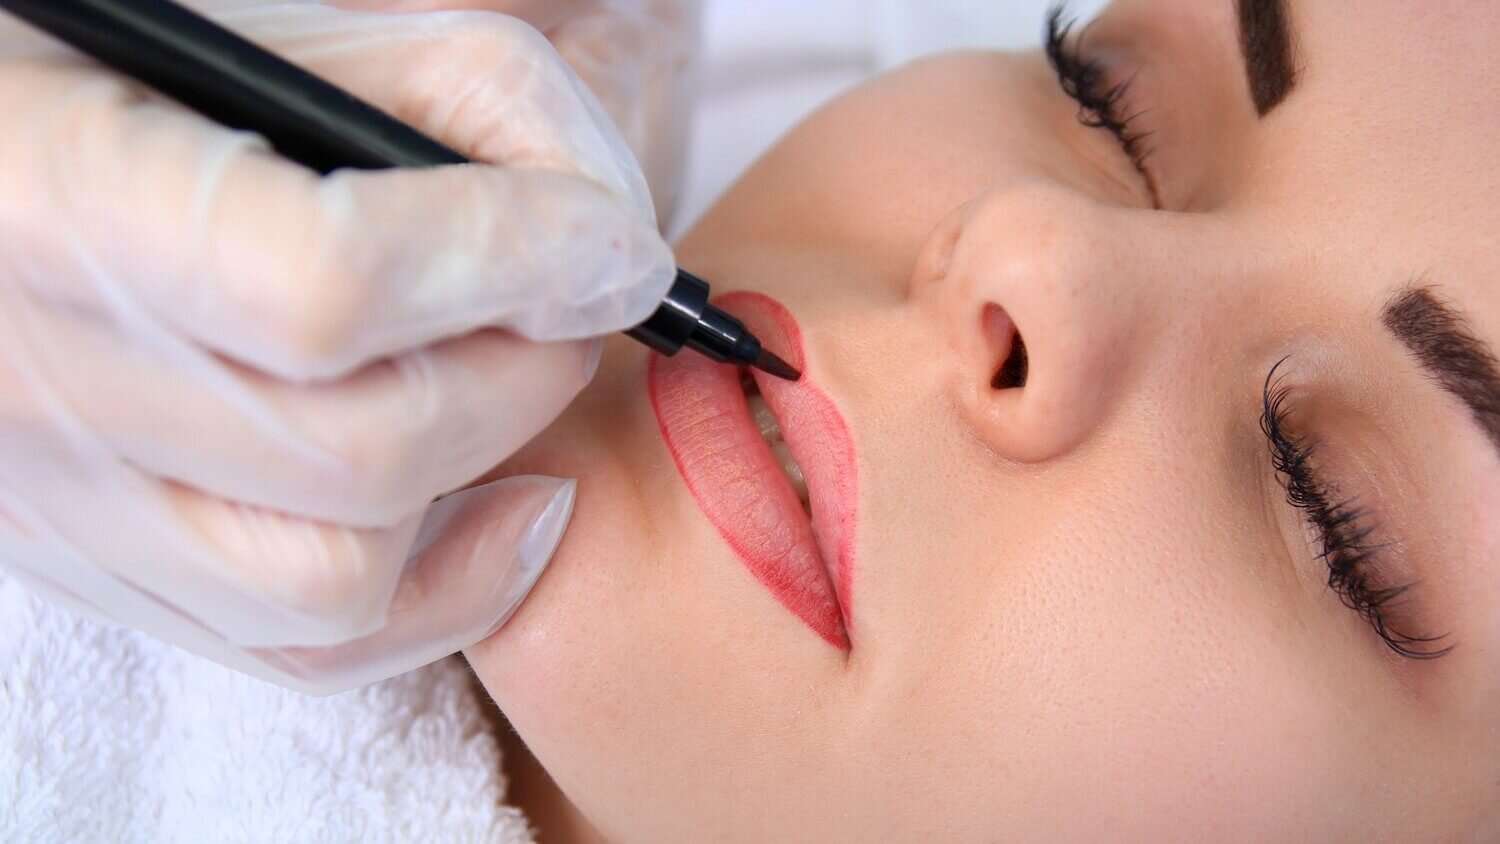
Understanding the lip tattoo healing process day by day pictures helps you anticipate changes, manage expectations, and care for your new look with confidence. From initial swelling to full color saturation, each phase reveals how your skin adapts. Expect Magic After Your Lip Blush Tattoo Appointment shows how a simple touch can transform your appearance with time and proper aftercare.
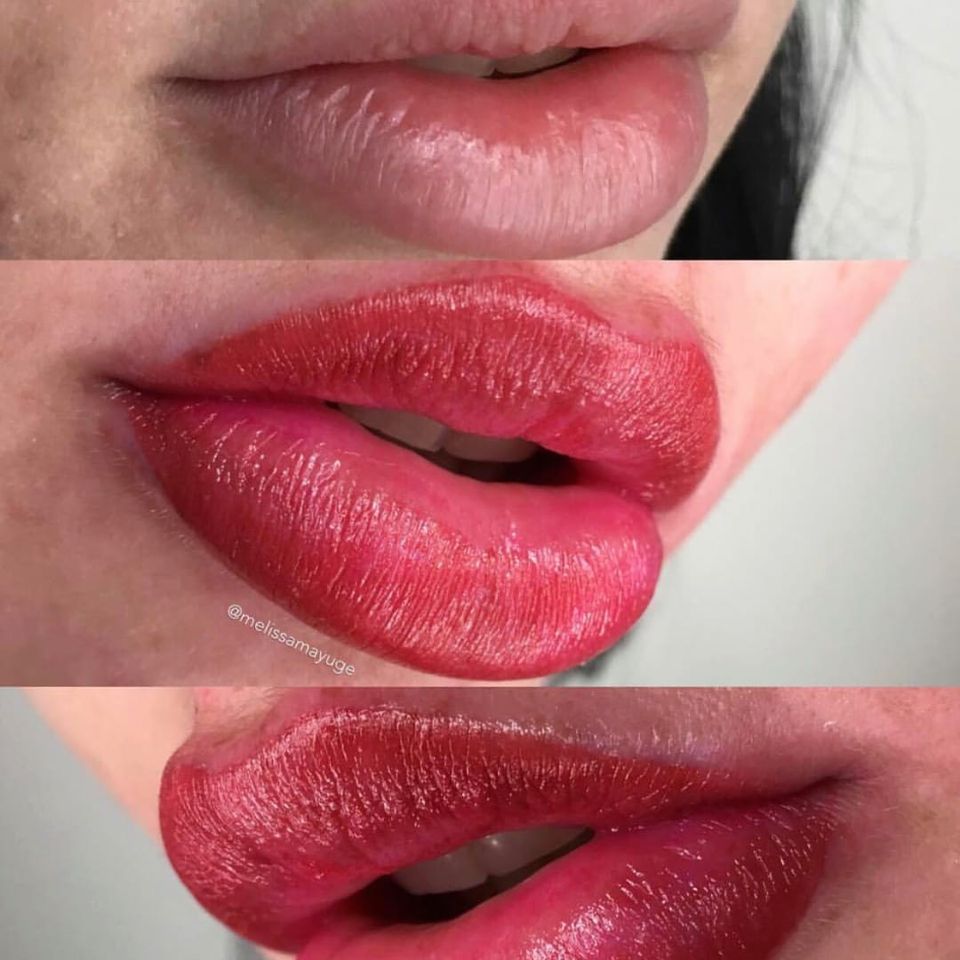
Each day brings new changes—swelling, flaking, and color deepening—so tracking the healing process day by day pictures gives you a clear roadmap.
By day 7, your lip tattoo starts to settle, and healing becomes more stable—key moments to watch in your day-by-day pictures.
Lip Tattoo Healing: Day-by-Day Guide
Understanding the lip tattoo healing process day by day pictures helps you track progress and care for your tattoo properly. From swelling to full healing, each stage matters. Learn how your lip tattoo evolves over time with real visuals and expert tips. This guide covers the full journey, including common challenges and how to speed up recovery. Whether you’re new to lip tattoos or refining your results, seeing the healing stages in action makes it easier to stay patient and consistent. The natural transformation from raw to smooth is both fascinating and rewarding—especially when paired with proper aftercare. This detailed look at the lip tattoo healing process day by day pictures gives you a clear, realistic timeline to follow.
First 24 hours: redness, swelling, and peeling begin as the skin adjusts to the ink.
By day 7, your lip should be mostly healed, with minor flaking and fading of the initial color—this is where lip blush healing stages start to show subtle changes.

Lip Tattoo Healing: Day-by-Day Guide
Understanding the lip tattoo healing process day by day pictures helps you track progress, manage expectations, and ensure your tattoo heals properly. From initial swelling to full color settling, each phase matters. Following simple aftercare tips—like keeping the area clean and avoiding sun exposure—leads to natural, long-lasting results. This journey is both delicate and rewarding, and seeing your lip tattoo evolve step by step makes all the difference.
Healing starts with swelling and flaking—watch the first 48 hours closely. Lip tattoo healing process day by day pictures show how the skin reacts, helping you stay patient and informed.
By day 7, your lip should feel more comfortable. Proper aftercare ensures your lip tattoo heals smoothly and stays vibrant.
Lip Tattoo Healing: Day-by-Day Guide
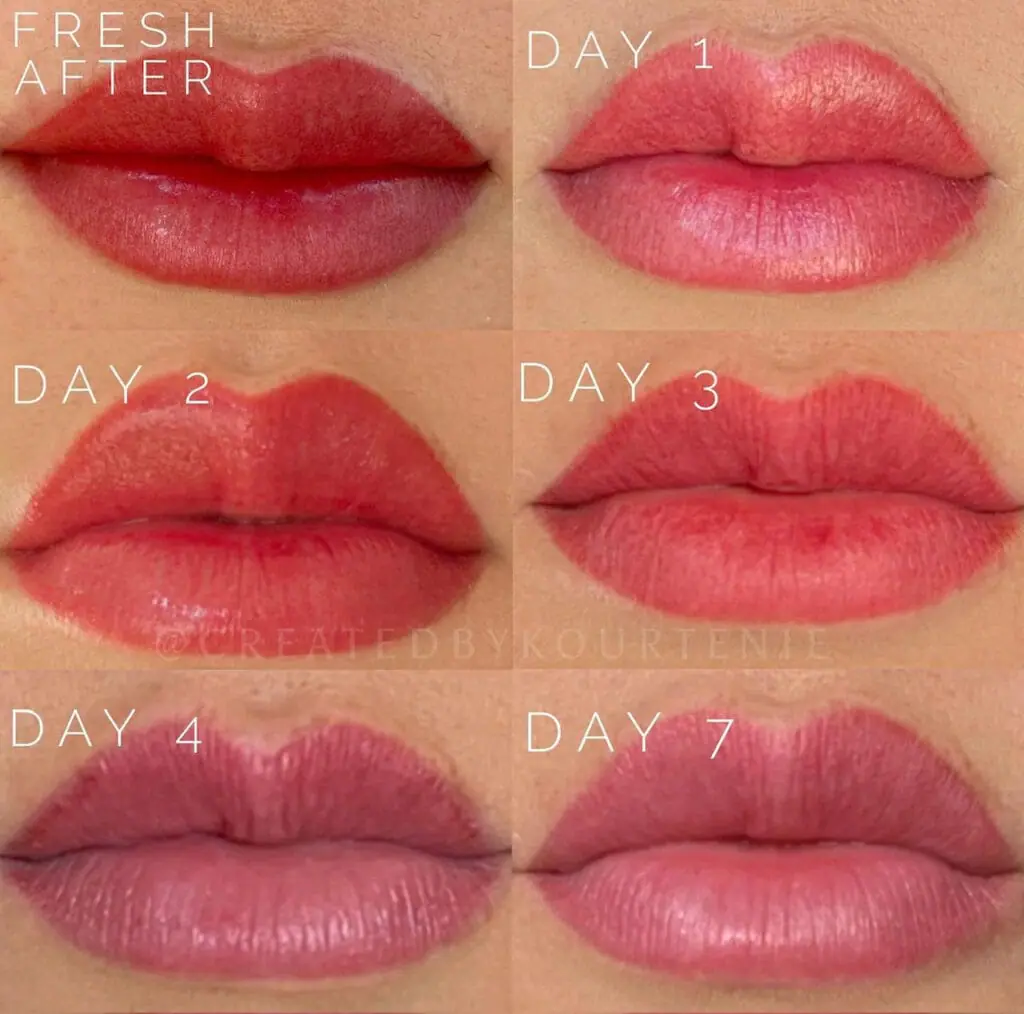
Walking through the lip tattoo healing journey, from swelling and peeling to full recovery, this real-life account captures the subtle shifts each day brings. With daily photos showing texture, color, and texture changes, it’s clear how patience pays off. Inspired by Lip Blush Healing Day by Day: A Personal Journey, this guide offers a transparent, honest look at what to expect—no magic, just time and care.
First 24 hours: redness, swelling, and dryness are normal as the skin adjusts. Lip tattoo healing process day by day pictures show how the area starts to settle.
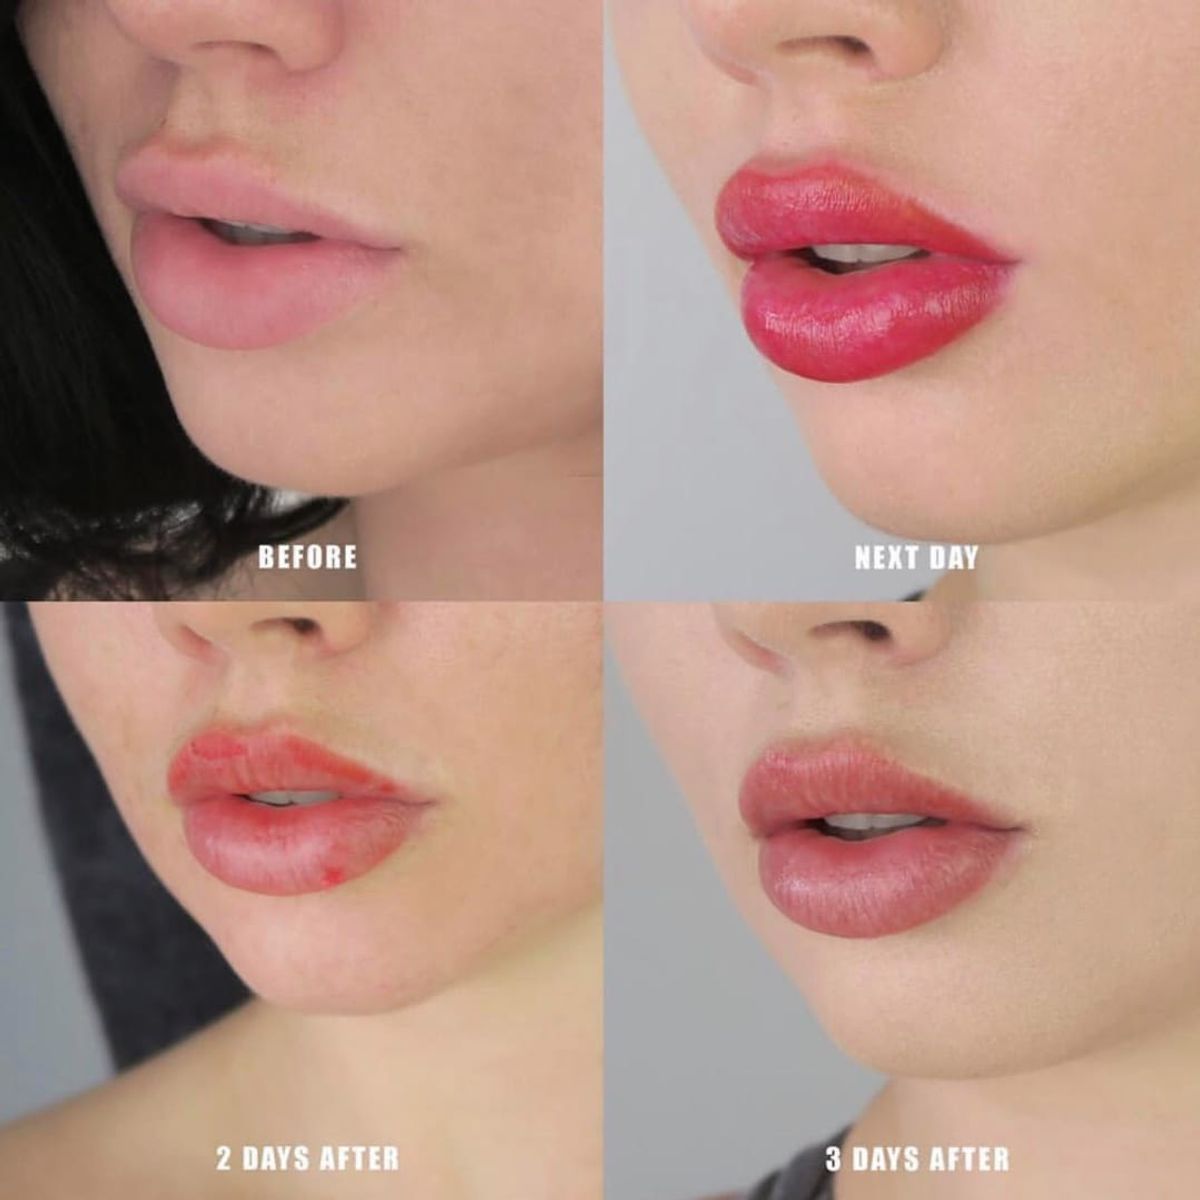
By day 3, flaking begins—this is part of the healing process. Lip tattoo healing process day by day pictures reveal the fading of initial redness and the emergence of soft color.

Lip Tattoo Healing: A Day-by-Day Guide
Understanding the lip tattoo healing process day by day pictures helps you anticipate changes, manage expectations, and care for your tattoo properly. From initial swelling to full color return, each phase matters. Knowing what to expect keeps your results vibrant and long-lasting—especially when paired with healthy habits like hydration and avoiding irritants. How Your Lifestyle Impacts Your Lip Tattoo Results shows how daily choices shape final outcomes.
Each day brings new changes—crusting, fading, or color deepening—so tracking your healing with lip tattoo healing process day by day pictures gives clarity and confidence.
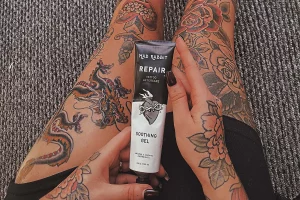
Staying hydrated, avoiding alcohol, and protecting your lips from sun exposure help speed healing and preserve color quality.
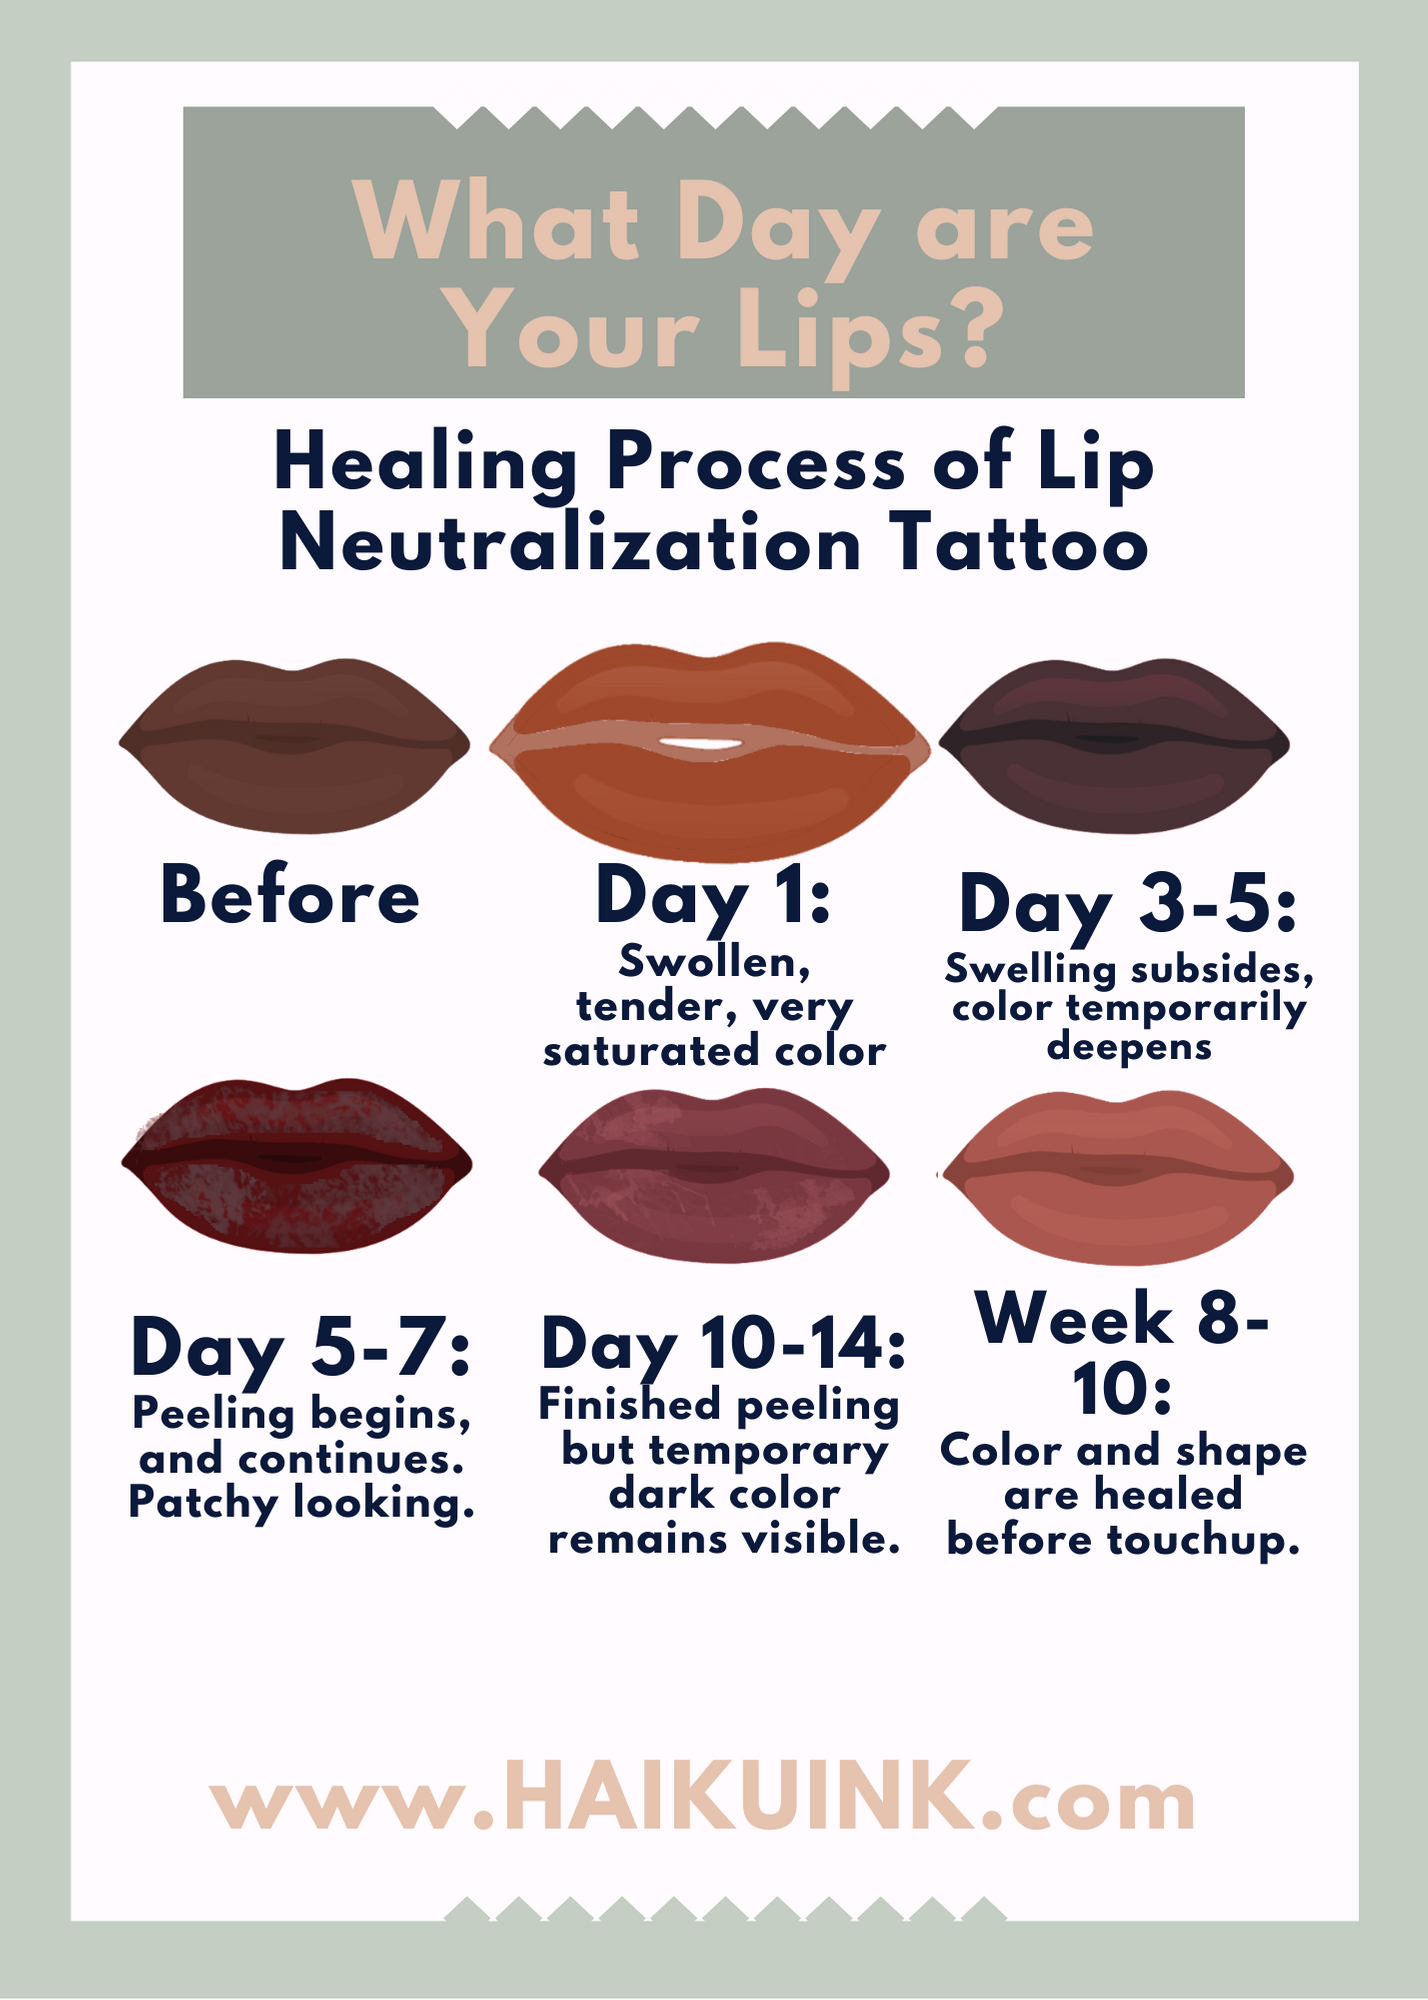
Lip Tattoo Healing: Day-by-Day Journey
Understanding the lip tattoo healing process day by day pictures helps you anticipate what to expect—each stage from swelling to full color return is natural and manageable. Whether you’re new to body art or returning to a favorite look, seeing real-life progress gives confidence. For those curious about how tattoos heal on delicate skin like lips, visual guides are invaluable. Check out tattoo healing stages day by day for a detailed walkthrough of each phase, including how the skin renews itself over time. HAIRY might not be the first thing you think of, but the way skin heals can be just as textured as any hair follicle.
The first few days after a lip tattoo are all about managing swelling and peeling—this is normal and part of the healing process. You’ll notice redness, dryness, and flaking, which typically peak within 48 to 72 hours. Lip tattoo healing process day by day pictures show these early signs clearly, helping you stay calm and informed.
By day 7, most people see the first signs of color settling in, though the final shade may take weeks. Proper aftercare is key—avoiding sun exposure and using gentle ointments helps. For the best results, try a trusted best healing ointment for tattoos to support skin recovery. If you’re wondering how your lip tattoo looks after five years, check out lip tattoo after 5 years for a real-life example of long-term beauty and durability.

Lip Tattoo Healing: Day-by-Day Journey
Understanding the lip tattoo healing process day by day pictures helps you anticipate changes, manage discomfort, and care for your skin properly. This guide walks through each phase, from initial swelling to full recovery, with real-life visuals and practical tips. Just like the Lip Blush Healing Process, patience and consistent aftercare are key to achieving a natural, long-lasting result.
Each day brings a new stage—from redness and peeling to softening and fading. Lip tattoo healing process day by day pictures show exactly what to expect, helping you stay calm and confident.
Day 3 to 7 is when most changes happen. Swelling reduces, the skin begins to heal, and you’ll notice the color settling in—perfect for seeing how the lip tattoo healing process unfolds naturally.
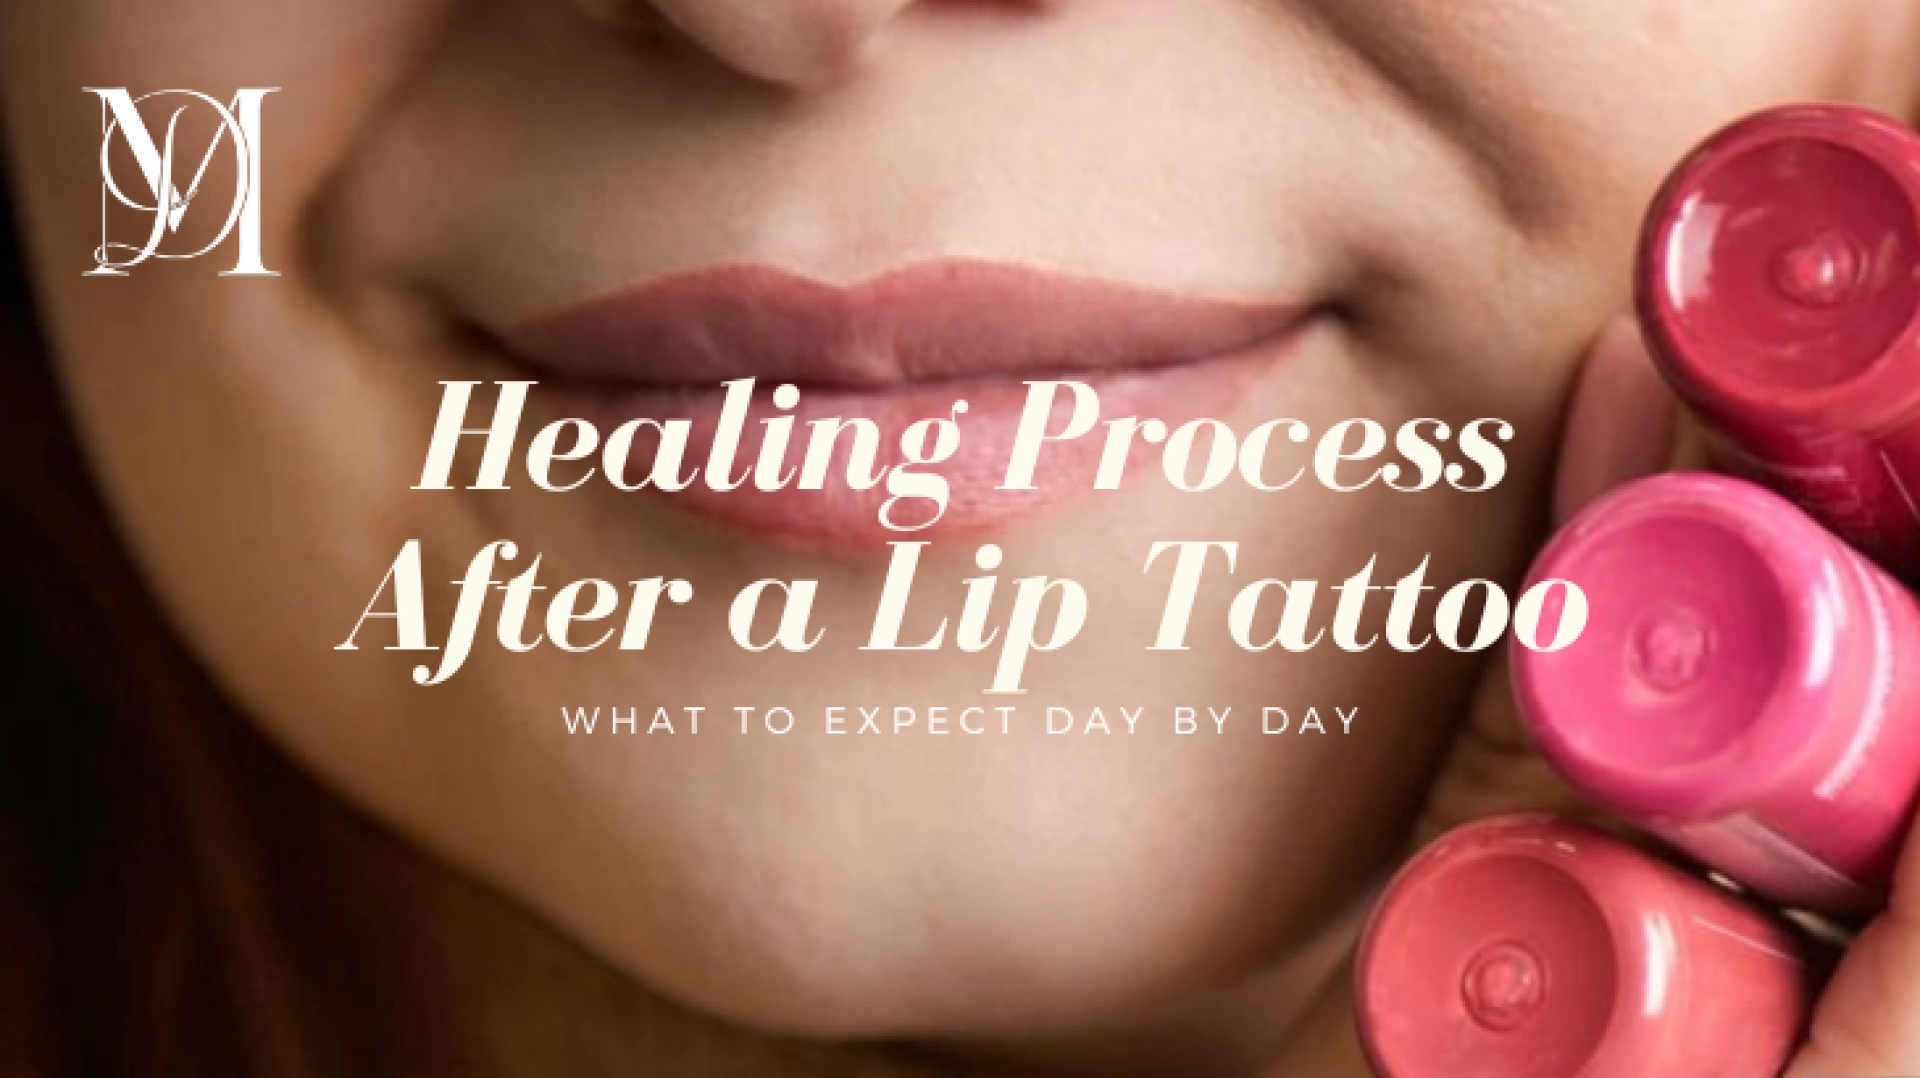
Lip Tattoo Healing: A Day-by-Day Guide
Understanding the lip tattoo healing process day by day pictures helps you track progress, manage expectations, and care for your skin properly. From swelling to color settling, each stage offers clues about your recovery. Knowing what to expect during Healing Process After a Lip Tattoo, What to Expect Day by Day ensures you stay calm and informed throughout the journey.
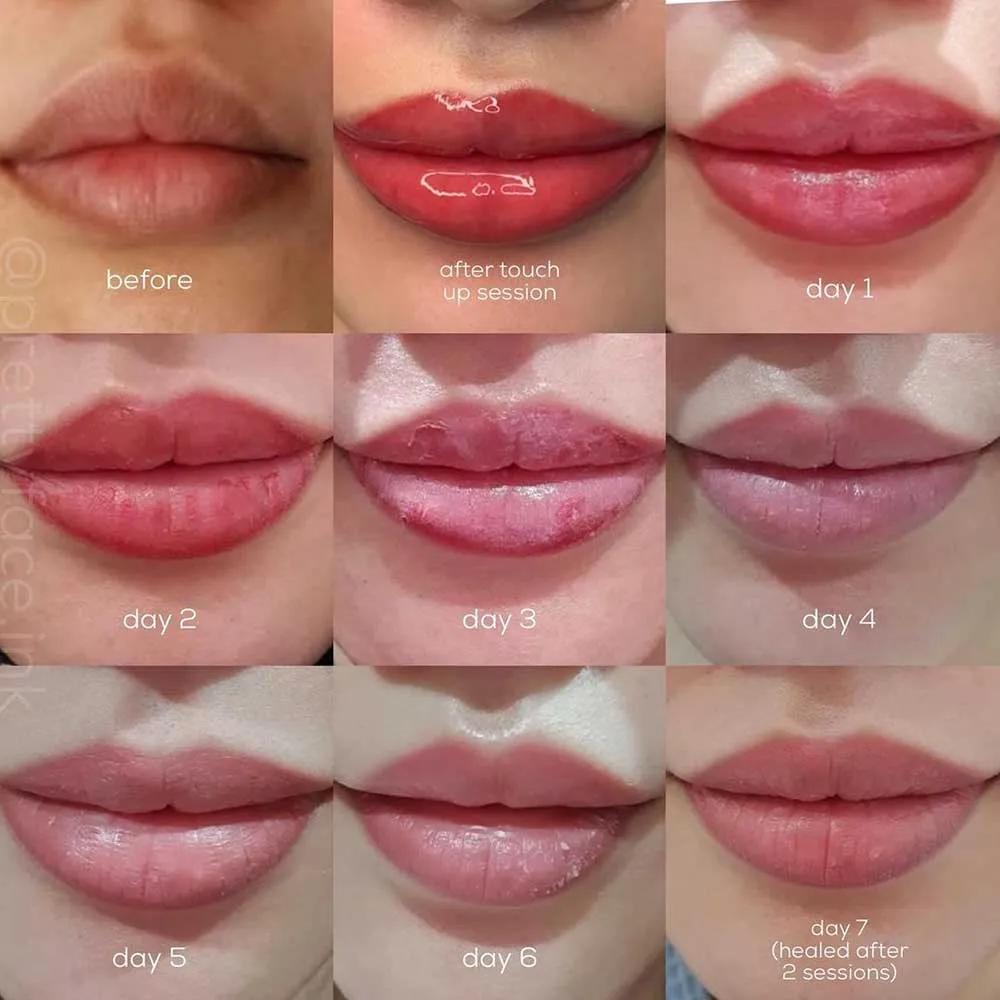
Day 1 to 3: Redness, swelling, and flaking are normal—keep the area clean and hydrated.
By day 5-7, the skin begins to heal, fading the redness and revealing the initial color, making lip tattoo healing process day by day pictures a great way to monitor changes.
Lip Tattoo Healing: Day-by-Day Guide
Understanding the lip tattoo healing process day by day pictures helps you track recovery, manage expectations, and avoid common mistakes. From swelling to color settling, each phase matters—especially when paired with tips from Lip blushing FAQs: Our smart guide to cosmetic lip tattoo…
Healing starts with redness and swelling—day one to three is all about managing discomfort and keeping the area clean.
By day five, your lips begin to soften, and the color starts to stabilize—perfect time to check out lip tattoo healing process day by day pictures for visual clarity.
Lip Tattoo Healing: Day-by-Day Guide
Understanding the lip tattoo healing process day by day pictures helps you track progress, manage expectations, and care for your tattoo properly. From initial swelling to full healing, each phase matters—especially when following a clear, visual timeline. This guide breaks down what to expect, using real-life healing snapshots to show how your lip tattoo evolves over time. Whether you’re new to body art or refining your routine, seeing the journey step-by-step makes it easier to stay patient and consistent.
Healing starts with redness and swelling—day one to three—followed by peeling and fading. Lip tattoo healing process day by day pictures show how skin regenerates and fades naturally.
By day 7, your lip should be mostly healed, with scabbing and flaking ending. These healing stages are visible in real lip tattoo healing process day by day pictures, making it easier to track progress.
Lip Tattoo Healing: Day-by-Day Guide
Understanding the lip tattoo healing process day by day pictures helps you anticipate changes, manage discomfort, and care for your tattoo properly. From initial swelling to full healing, each stage matters. This step-by-step journey ensures your lip blush tattoo looks natural and lasts longer. Learn how to avoid common mistakes and keep your skin healthy throughout recovery—especially when following tips from Lip Blush Tattoos: Everything You Need to Know.
Healing starts with redness and swelling, then gradually fades as skin regenerates. Lip tattoo healing process day by day pictures show exactly what to expect at each phase.
By day 7, your lip should be mostly healed, with minimal scabbing. These visual guides help track progress and ensure proper aftercare.
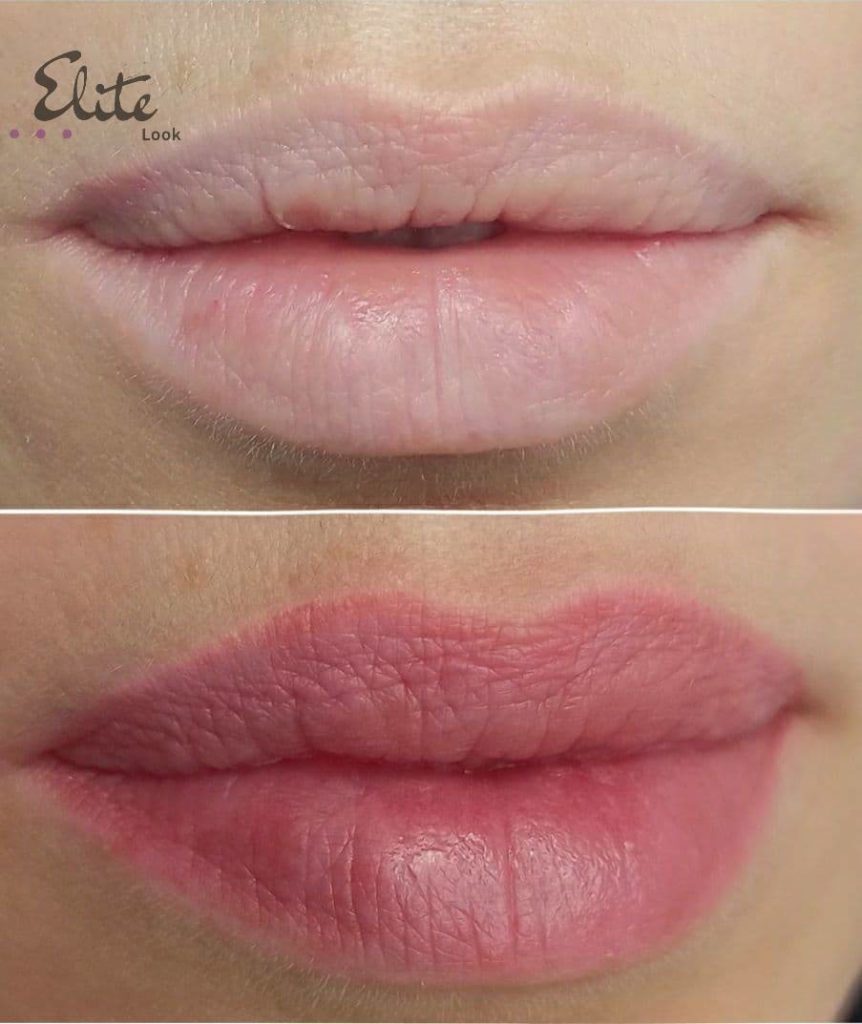
Lip Tattoo Healing: Day-by-Day Journey
Walking through the lip tattoo healing process day by day pictures reveals how delicate skin transforms—starting with redness and swelling, then softening into a smooth, natural finish. This real-life guide draws from personal experience, offering honest insights into what to expect and how to care for your new tattoo. Inspired by Lip Blush Healing Day by Day: A Personal Journey, this narrative blends practical tips with emotional honesty, making it easy to follow and relatable.
Day one brings swelling and redness—normal, not alarming. Keep lips moisturized and avoid sun exposure as healing begins.
By day three, flaking starts to fade. Using healing ointments and avoiding licking helps speed recovery.

Lip Tattoo Healing: Day-by-Day Guide
Understanding the lip tattoo healing process day by day pictures helps you track progress and ensure proper care. From initial swelling to full healing, each phase matters. Learn how to care for your tattoo with practical tips and real-life examples. This guide covers everything from the first 24 hours to long-term results, including how to prevent scabbing and maintain color. For a deeper look at how lip tattoos evolve over time, check out lip tattoo after 5 years and see how lasting beauty can be achieved with patience and care.
The first 48 hours after getting a lip tattoo are crucial—keep the area clean, avoid touching it, and stay hydrated. Proper hydration supports skin recovery and helps prevent irritation.
By day 7, most redness fades, and the skin begins to settle. Using a gentle moisturizer and avoiding sun exposure ensures better healing and vibrant results.

Lip Tattoo Healing: Day-by-Day Guide
Understanding the lip tattoo healing process day by day pictures helps you track progress, manage expectations, and care for your new color. From swelling to full color reveal, this step-by-step journey shows exactly what to expect. Learn how to heal properly and avoid common mistakes with real-life visuals and expert tips. Whether you’re getting a bold red or soft nude, seeing the transformation over time makes the process more manageable and exciting.
Healing starts with swelling and peeling—watch lip tattoo healing process day by day pictures to see how your lips evolve over time.
Day 3 to 7 shows fading and flaking—key moments to monitor closely with real healing photos.
Lip Tattoo Healing: Day-by-Day Guide
Understanding the lip tattoo healing process day by day pictures helps you anticipate what to expect, manage discomfort, and avoid common mistakes—especially if you’re considering a procedure in a place like Columbia, Maryland where aesthetic trends are growing.
Healing starts with swelling and peeling—first 24 to 48 hours after the tattoo. Lip tattoo healing process day by day pictures show how skin evolves, from redness to softening.
By day 7, your lip should be mostly healed, though some flaking remains. These day-by-day visuals help track progress safely and confidently.
Lip Tattoo Healing: Day-by-Day Guide
Understanding the lip tattoo healing process day by day pictures helps you navigate recovery with confidence. From swelling to color settling, each stage matters. Learn how your lips transform over time and why proper care is essential. This step-by-step journey shows what to expect—especially when combining with subtle enhancements like Lip Blush for a natural finish.
Expect redness, peeling, and sensitivity during the first few days after getting a lip tattoo. Healing progresses slowly, with new color appearing gradually. Lip tattoo healing process day by day pictures make it easy to track your progress.
By day 7, most irritation fades and the skin begins to retexture. Proper aftercare ensures long-lasting results and prevents scabbing. Lip tattoo healing process day by day pictures offer a realistic view of what to expect.

Lip Tattoo Healing: Day-by-Day Guide
Understanding the lip tattoo healing process day by day pictures helps you track progress, manage expectations, and care for your skin properly. From the first few hours after the procedure to full healing, each stage plays a role in achieving a natural, vibrant result. This guide breaks down what to expect, offering real insights into how your lip tattoo evolves over time—especially when you follow a consistent aftercare routine. Whether you’re considering a lip blush or a subtle design, seeing the healing journey visually makes all the difference.
Early stages involve swelling and peeling—knowing what to expect helps reduce anxiety. Lip tattoo healing process day by day pictures show how your lips transform over time, making it easier to stay patient and consistent with care.
By day 7, most redness fades and the color stabilizes. Lip tattoo healing process day by day pictures reveal how the pigment settles, giving you a clear view of the final outcome.
Lip Tattoo Healing: Day-by-Day Guide
Understanding the lip tattoo healing process day by day pictures helps you stay calm and informed. From swelling to color settling, each phase matters. Get the best Lipstick Effect Lip Tattoo in Sterling, VA for a natural, long-lasting result that blends seamlessly with your skin.
Healing starts with redness and swelling—expect it on day one. Lip tattoo healing process day by day pictures show how the skin gradually calms and regains texture.
By day three, the lips begin to soften. Watch the healing progress with day-by-day pictures to know what to expect and how to care properly.
Lip Tattoo Healing: Day-by-Day Journey
Understanding the lip tattoo healing process day by day pictures helps you track progress and care for your new tattoo. From swelling to skin renewal, each stage matters. Learn how your lip tattoo evolves over time with real-life visuals and expert insights—just like the Lip Blush Healing Process Day By Day Stages & Timeline, but tailored for lip tattoos.
Day one brings redness and swelling—expect irritation as your skin adjusts. Lip tattoo healing process day by day pictures show this early phase clearly, helping you stay patient and informed.
By day three, flaking and peeling begin. This is normal as skin sheds old layers. These changes are visible in lip tattoo healing process day by day pictures, giving a clear view of recovery stages.
Lip Tattoo Healing: Day-by-Day Guide
Understanding the lip tattoo healing process day by day pictures helps you stay informed and confident through each stage. From initial swelling to full color return, this journey is both unique and manageable. Learn how your lips evolve, what to expect, and how to care for them properly—especially when considering options like Lip Blush Tattoos: Everything You Need to Know.
Healing starts with redness and swelling, then gradually fades as skin renews. Lip tattoo healing process day by day pictures show this progression clearly, helping you anticipate changes and avoid common mistakes.
By day 7, most irritation settles. Lip tattoo healing process day by day pictures reveal how the color deepens and skin softens—key signs of healthy recovery.
Lip Tattoo Healing: Day-by-Day Guide
Understanding the lip tattoo healing process day by day pictures helps you track progress and care for your tattoo properly. From initial swelling to full healing, each stage matters. This guide breaks down what to expect, offering real-life insights and tips for a smooth recovery—especially after getting a lip blush tattoo. Perfectly Healed Lip Blush Tattoo 101 covers the essentials for long-lasting results and natural-looking color.
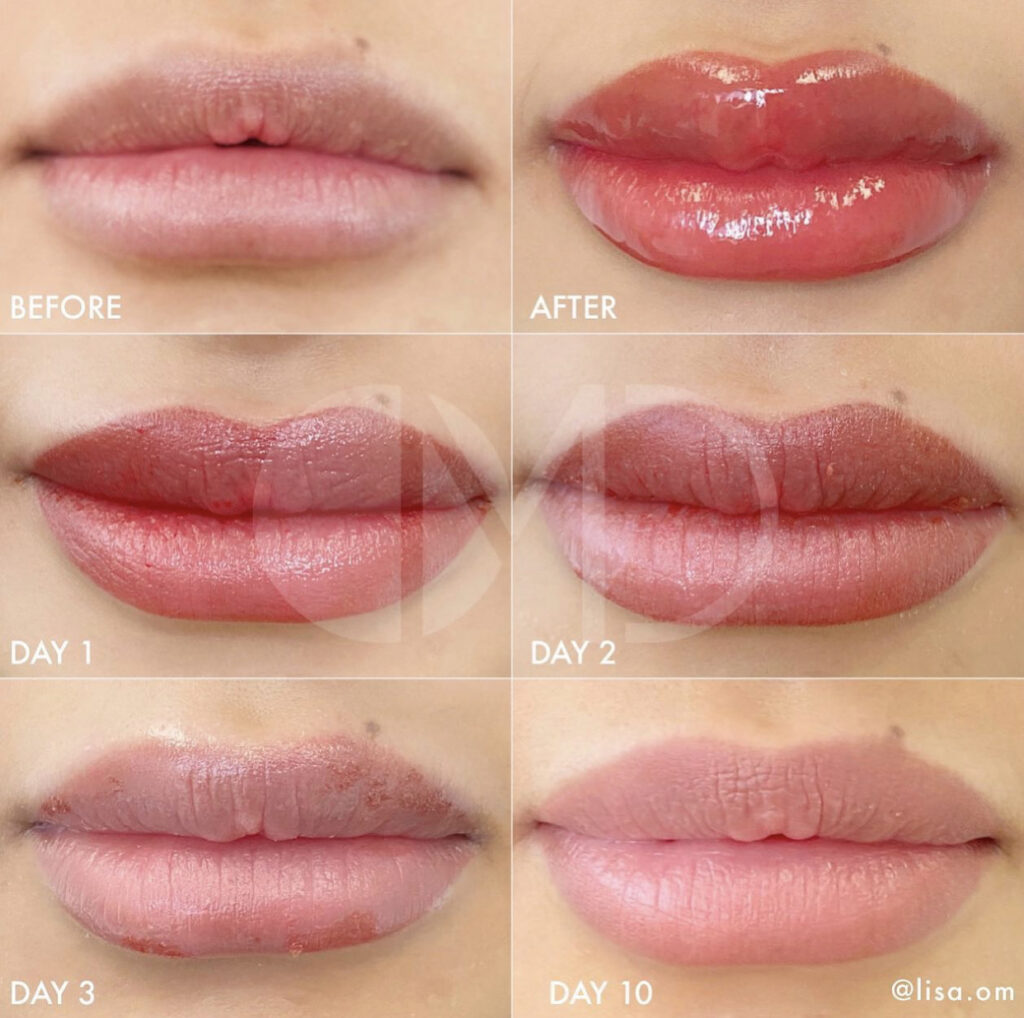
Healing starts with redness and peeling—expect changes daily. Lip tattoo healing process day by day pictures show how your skin evolves, from raw to smooth. Patience is key to avoiding scarring or fading.
By day 10, most swelling fades. Lip tattoo healing process day by day pictures reveal the shift from pink to a natural flush. This is when proper aftercare truly pays off.
Lip Tattoo Healing: Day-by-Day Guide
Understanding the lip tattoo healing process day by day pictures helps you stay calm and informed. From the first few hours after the procedure to full healing, each stage matters. At Best Permanent Lip Contour Treatment in Wethersfield, CT, we emphasize gentle care to ensure natural, lasting results. Real-life recovery timelines and visual progress are key—this guide walks you through it all with clear, practical insights. For those curious about long-term outcomes, check out our gallery of a lip tattoo after 5 years to see how it holds up over time.
The first 24 hours are crucial—keep the area clean, avoid touching, and stay hydrated. You’ll notice swelling and slight redness, which is normal. Healing progresses slowly, and daily photos help track progress. These lip tattoo healing process day by day pictures show exactly what to expect.
By day 7, the surface starts to fade and heal. Avoid sun exposure and harsh products. Use a gentle best healing ointment for tattoos to support skin recovery and reduce irritation. Consistent care ensures your lip tattoo stays vibrant and natural.

Lip Tattoo Healing: A Day-by-Day Guide
Understanding the lip tattoo healing process day by day pictures helps you stay patient and confident through each stage—whether you’re going for a subtle blush or a bold natural look. This journey, rooted in why lip blush tattoo is the ultimate hack for a natural look, shows how small changes lead to big results over time.
Healing starts with swelling and peeling—day by day pictures reveal how your lips transform from red and raw to soft and smooth.
By day 7, most people notice a soft, natural tone forming, making the lip tattoo feel like it’s part of your skin, not a sticker.
Lip Tattoo Healing: A Day-by-Day Guide
Understanding the lip tattoo healing process day by day pictures helps you track progress, manage expectations, and care for your skin properly. This natural, step-by-step journey mirrors the Day by Day Microblading Healing Process, offering insight into how your skin adapts over time—making it easier to stay patient and confident through each phase.
Each day brings subtle changes—redness fades, scabbing settles, and color deepens. Lip tattoo healing process day by day pictures show exactly how your skin evolves, giving you a clear timeline to follow.
Day one to day seven reveals key shifts: swelling, flaking, and pigment settling. These visuals help you recognize normal healing signs and avoid mistakes.

Lip Tattoo Healing: Day-by-Day Guide
Understanding the lip tattoo healing process day by day pictures helps you track progress and care for your tattoo properly. From initial swelling to full color development, each stage matters. TLC Lip Blushing offers a gentle, natural touch that complements the healing journey, ensuring your results look smooth and vibrant over time.
Healing starts with redness and swelling—expect this in the first 24 to 48 hours. Keeping the area clean and hydrated is key. Lip tattoo healing process day by day pictures show how the skin evolves, making it easier to stay patient and consistent.
By day 7, the skin begins to settle. Peeling and fading may occur, but this is normal. Using aloe and avoiding sun exposure helps. Lip tattoo healing process day by day pictures offer a clear visual timeline to guide your care.

Lip Tattoo Healing: Day-by-Day Guide
Understanding the lip tattoo healing process day by day pictures helps you track recovery, manage discomfort, and ensure your tattoo looks vibrant. From swelling to fading, each phase is natural—knowing what to expect makes all the difference. Follow expert tips on post care & lip blush aftercare instructions to keep your results flawless and long-lasting.
Healing starts with redness and swelling—expect it on day one. Lip tattoo healing process day by day pictures show how your skin evolves, from raw to smooth over weeks.
By day three, peeling and flaking begin. Keep the area clean and moisturized with gentle aftercare to support recovery and prevent irritation.
Lip Tattoo Healing: Day-by-Day Guide
Understanding the lip tattoo healing process day by day pictures helps you anticipate changes, manage expectations, and care for your skin properly. From swelling to color settling, each stage matters. This step-by-step journey ensures your results look natural and long-lasting. Whether you’re new to cosmetic lip tattooing or refining your technique, seeing real healing timelines gives confidence. Learn how your lips transform over time with clear visuals and expert insights—especially useful when comparing different aftercare routines. Lip blushing FAQs: Our smart guide to cosmetic lip tattoo offers practical answers to common concerns, helping you make informed choices.
Day one: redness and swelling are normal, and you’ll see the initial mark appear. Healing starts with basic care—keep it clean and hydrated.
By day three, the redness fades and the lip begins to soften, with color settling into place. Healing pictures show this transition clearly.
Lip Tattoo Healing: A Day-by-Day Guide
Understanding the lip tattoo healing process day by day pictures helps you track progress, manage expectations, and care for your skin properly. From the first days of swelling to full color development, each phase matters. This guide breaks down what to expect, offering real insights based on actual healing journeys. Whether you’re new to lip tattoos or refining your routine, seeing the transformation step by step—through day-by-day pictures—makes the process clearer and more manageable. Learn how to spot signs of healing, avoid common mistakes, and ensure your results last.
First 24 hours: swelling, peeling, and sensitivity are normal as the skin adjusts to the tattoo ink.
By day 7, most redness fades, and the lip begins to settle into its final shape—key moments to track with healing pictures.